ayeT-Studios Tracking Library Integration Guide (v1.1)
Updates
2019-02-01: v1.1 - Updated Tracking Library to prevent warnings on Android 8+
2017-04-28: v1.0 - Initial Release of our Conversion Tracking Library (Android)
Introduction
ayeT-Studios provides a free tracking library can be used as an easy to integrate option for any kind of CPI and CPA campaign conversion tracking. It offers real time installation, startup and event tracking, advanced fraud detection and the capability to drive high volume campaigns while only adding 11kb of payload to your app. The integration is simple, shouldn't take more than 5 minutes, works well with other libraries such as firebase / analytics and doesn't require additional permissions.Attention: As of now, the SDK is available for Android only.
Topics
- Download the library
- Add the library to your Android Studio project
- Installation Tracking Setup (CPI campaigns)
- Event Tracking Setup (CPA campaigns)
- Appendix I: Multiple Referrer Receivers in your app
- Appendix II: Troubleshooting / Errors on Campaign Creation
1. Download the library
2. Add the library to your Android Studio project
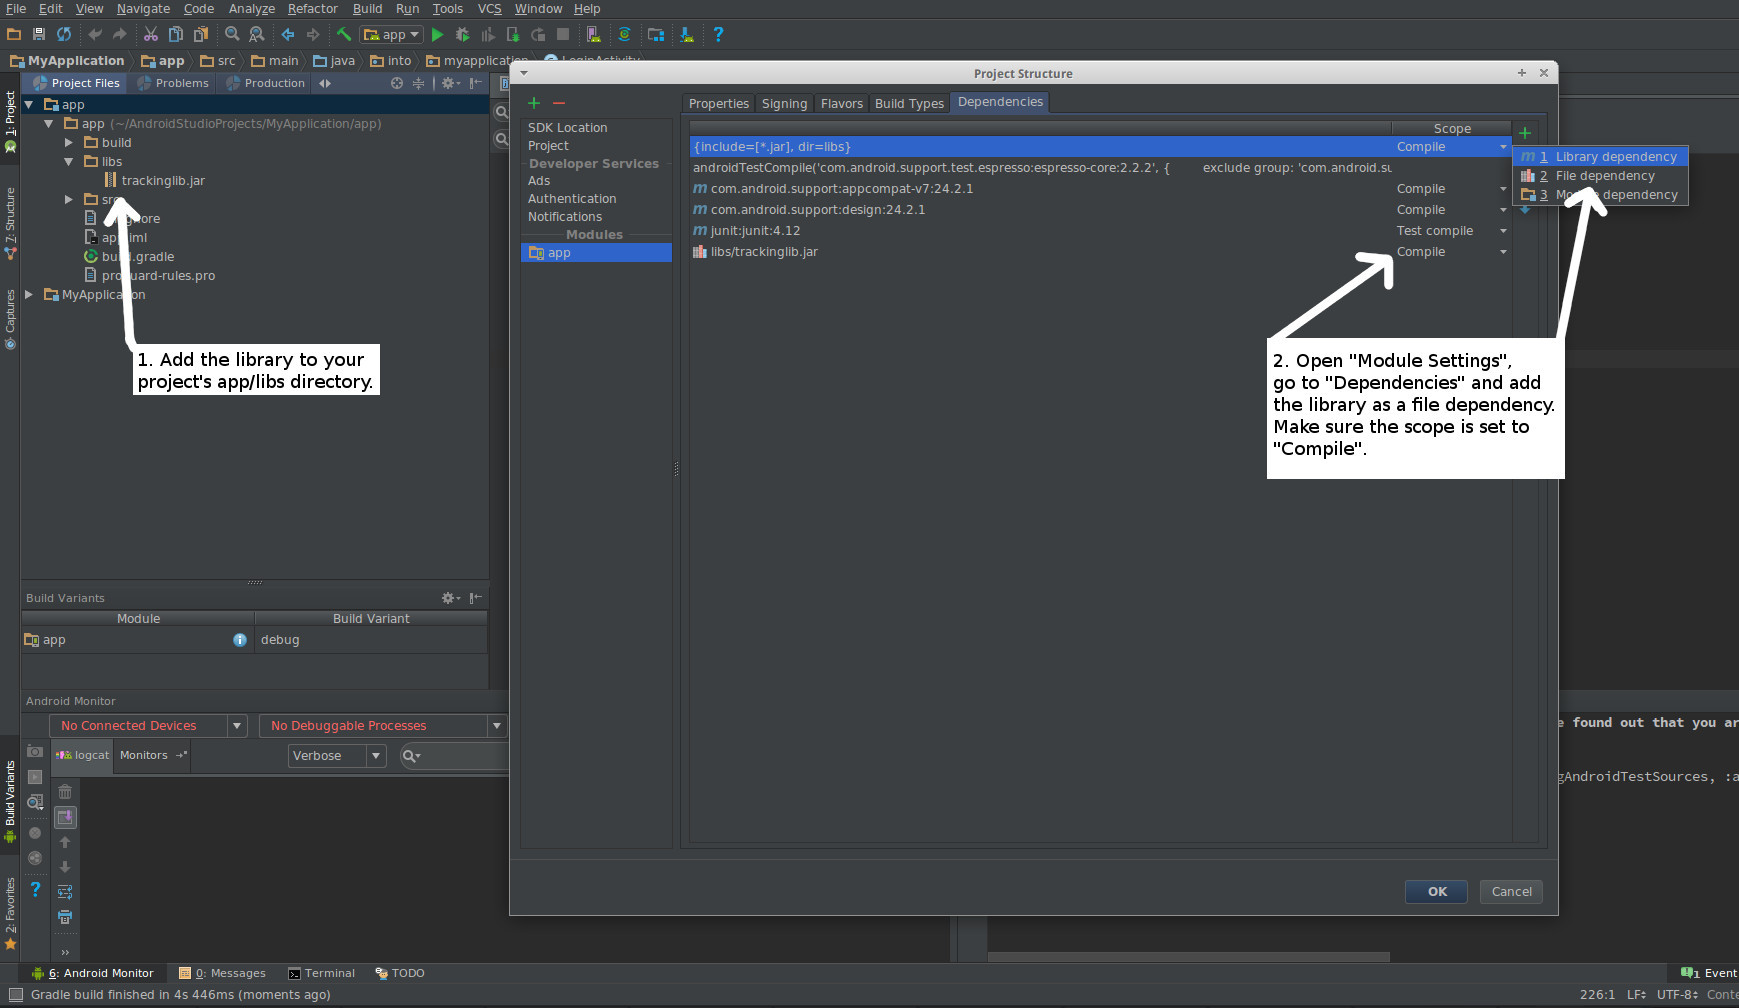
Copy the downloaded jar library to your Android Studio project (in the app/libs/ folder).
Go to "Module Settings" (F12 or right-click your app in the Project View) and check the dependencies tab to make sure the library is added as a file dependency and set to "Compile":
Afterwards open your AndroidManifest.xml and add the broadcast receiver right before the closing </application> tag:
Also make sure to check your permissions in the AndroidManifest.xml:
This is an example for a complete AndroidManifest.xml:
Go to "Module Settings" (F12 or right-click your app in the Project View) and check the dependencies tab to make sure the library is added as a file dependency and set to "Compile":
Afterwards open your AndroidManifest.xml and add the broadcast receiver right before the closing </application> tag:
<receiver android:name="act.TrackingReceiver"  android:exported="true">
    <intent-filter>
        <action android:name="com.android.vending.INSTALL_REFERRER" />
    </intent-filter>
</receiver>
Also make sure to check your permissions in the AndroidManifest.xml:
<uses-permission android:name="android.permission.INTERNET" />  <!-- mandatory permission -->

<uses-permission android:name="android.permission.READ_PHONE_STATE" />  <!-- optional but recommended for fraud checks and if targeting android 5.1 or older -->
<uses-permission android:name="android.permission.ACCESS_WIFI_STATE" /> <!-- optional -->
This is an example for a complete AndroidManifest.xml:
<?xml version="1.0" encoding="utf-8"?>
<manifest xmlns:android="http://schemas.android.com/apk/res/android"
    package="into.myapplication">

    <uses-permission android:name="android.permission.INTERNET" />  <!-- mandatory permission -->

	<uses-permission android:name="android.permission.READ_PHONE_STATE" />  <!-- optional but recommended for fraud checks and if targeting android 5.1 or older -->
    <uses-permission android:name="android.permission.ACCESS_WIFI_STATE" /> <!-- optional -->

    <application
        android:allowBackup="true"
        android:icon="@mipmap/ic_launcher"
        android:label="@string/app_name"
        android:supportsRtl="true"
        android:theme="@style/AppTheme">
        <activity
            android:name=".LoginActivity"
            android:label="@string/app_name">
            <intent-filter>
                <action android:name="android.intent.action.MAIN" />

                <category android:name="android.intent.category.LAUNCHER" />
            </intent-filter>
        </activity>

        <!-- Conversion Tracking Receiver -->
        <receiver android:name="act.TrackingReceiver"  android:exported="true">
            <intent-filter>
                <action android:name="com.android.vending.INSTALL_REFERRER" />
            </intent-filter>
        </receiver>

    </application>

</manifest>
3. Installation Tracking Setup (CPI campaigns)
To track installations & app openings for CPI campaigns, you have to include the following line in the onCreate() function of your main activity (you can find your main activity by looking for the android.intent.action.MAIN intent filter in your AndroidManifest.xml):
A complete example would look like this:
act.TrackingReceiver.init(getApplicationContext());
A complete example would look like this:
@Override
protected void onCreate(Bundle savedInstanceState) {
    super.onCreate(savedInstanceState);

    act.TrackingReceiver.init(getApplicationContext()); /* track installation */

    setContentView(R.layout.activity_main);
}
4. Event Tracking Setup (CPA campaigns)
In addition to the steps 1-3 above, you can define as many events as you want for CPA campaigns ("Event Tracking").
Whenever some event happens in your app you want to be tracked, you can use the following snippet:
A complete example which sends a login event when pressing a login button might look like this:
Whenever some event happens in your app you want to be tracked, you can use the following snippet:
act.TrackingReceiver.event(getApplicationContext(), "EVENT_NAME"); /* EVENT_NAME is a string (1-48 chars) of your choice */
A complete example which sends a login event when pressing a login button might look like this:
mEmailSignInButton.setOnClickListener(new OnClickListener() {
            @Override
            public void onClick(View view) {
		act.TrackingReceiver.event(getApplicationContext(), "login");
                attemptLogin();
            }
        });
5. Appendix I: Multiple Referrer Receivers in your app
It's likely that you want to support multiple broadcast receivers for the INSTALL_REFERRER intent later on. An example would be Google Analytics, other analytics / statistics SDKs or more third party tracking SDKs.
Since the Play Store will only fire one BroadcastReceiver in the manifest, the following example is showing how to use both Google Analytics and our Tracking SDK with a custom CombinedBroadcastReceiver class you can extend for additional SDKs.
CombinedBroadcastReceiver.java:
AndroidManifest.xml - the INSTALL_REFERRER receiver configuration
Since the Play Store will only fire one BroadcastReceiver in the manifest, the following example is showing how to use both Google Analytics and our Tracking SDK with a custom CombinedBroadcastReceiver class you can extend for additional SDKs.
CombinedBroadcastReceiver.java:
public class CombinedBroadcastReceiver extends BroadcastReceiver {
    @Override
    public void onReceive(Context context, Intent intent) {
        // Google Analytics
        new CampaignTrackingReceiver().onReceive(context, intent);

        // Conversion Tracking Installation Event
        new act.TrackingReceiver.onReceive(context, intent);

        // add more third party broadcast receivers here...
    }
}
AndroidManifest.xml - the INSTALL_REFERRER receiver configuration
<receiver android:name="com.yourapplication.CombinedBroadcastReceiver"  android:exported="true">
    <intent-filter>
        <action android:name="com.android.vending.INSTALL_REFERRER" />
    </intent-filter>
</receiver>
6. Appendix II: Troubleshooting / Errors on Campaign Creation
After integrating our library and updating your app on Google Play, you should be all set to create campaigns on our platform.
Important: Our server detects automatically if the SDK is implemented correctly at campaign creation. For this however, it's neccessary that your app received installs and the meantime and - if going for CPA campaigns - the chosen event has been triggered from your app in the past.
So the first measure to take if you cannot create a campaign for your app would be to uninstall it on one of your devices, reinstall it from Google Play, run the app and eventually complete the events you're aiming for!
There are 3 different error types you may get when trying to create a new campaign:
| Message | Solution |
| SDK TrackingReceiver not integrated in app | Either the SDK is not integrated or "act.TrackingReceiver" is not configured in your ApplicationManifest.xml |
| SDK TrackingReceiver.init() not called in main activity's onCreate() function. | The SDK is integrated in your app, however the init() call never happens (verify Step 3) |
| SDK TrackingReceiver.event("EventName") callback has never been fired in the app. | The SDK is integrated in your app, however the event you're trying to promote has never been reported to our servers. Check if the correct event is configured (see Step 4) and if it can be reached / triggered by users |